
Today at the Cannon show in Retford, James and I put on our Battle of Gallabat game using the I Ain't Been Shot Mum rules from Too Fat Lardies.
This battle saw one of the first British pushes against the Italians during the East Africa Campaign and took place on the 6th November 1940. Featuring Slims 10th Indian Infantry Brigade supported by a mixed squadron of 12 light and medium tanks, artillery and the RAF against a fort held by mainly Italian native troops.
At Salute in two weeks time we are playing another action from the campaign with our rather impressive - if I say so myself - Battle of Keren game. Pop over and say hello if you have the opportunity.
The forces were arrayed as follows James would play the Italians, myself the British
THE
BRITISH
TROOPS/ DICE
|
0
|
1
|
2
|
3
|
3/18th
Royal Garhwali Rifles
|
1,2,3
|
4
|
5,6,7
|
8,9,10
|
ARMOUR
|
Armour
|
Weapon
|
Speed
|
Notes
|
Vickers Mk6
Light Tank
|
2
|
MGs
|
Fast
|
|
Matilda
|
9
|
40mm (2”) gun, MG
|
Slow
|
|
3/18th
Royal Garhwali Rifles
Big Man 1: Lt-Col
‘Snap’ Tayler (Level 3)
Big Man 2: Lt
Shaw (Level 2)
Big Man 3:
Subedar Johal (Level 2)
Allies Platoon
1-6: 10 Garhwalis
Allied Platoons
7 & 8: Two 2” mortar teams
PRE-GAME STONK (air and artillery bombardment)
Allied Machine
Gun bonus: Vickers MMG + 4 crew [not really a bonus, just
the activation card for the MMG]
Allied Forward
Observer
Allied Support
1: 2 Medium Mortar section (3” mortars)
Allied Hesitant
Troops (represents troops being delayed by difficult going,
not low morale)
Allies Dynamic
Leader (Garhwalis only)
Blank cards:
Allied tank breakdown. On a roll of 1,
2, or 3 a random British tank has broken down/hit a rock and cannot move. On a roll of 1 it has hit a mine and is
abandoned.
6th
Royal Tank Regiment
Allied Big Man
4: Matilda HQ Tank (Level 2)
Allied Armour 1:
3 x Matilda Tanks
Allied Big Man
5: Vickers Mk6 Light HQ Tank (Level 2)
Allied Armour 2:
3 x Vickers Mk6 Lights
1st
Essex (reinforcements – Green)
Big Man: Lt
Jones (Level 2)
Big Man: Sgt
Chase (Level 2)
Allies Platoon
1-3: 10 Essex
Allied Platoons 4: 2”
mortar team
THE
ITALIANS
TROOPS/ DICE
|
0
|
1
|
2
|
3
|
Eritrean
Askaris, Blackshirts
|
1,2,3
|
4
|
5,6
|
7,8
|
AT Weapons
|
Range
0-6”
|
Range
6-12”
|
Range
12-18”
|
Solothurn AT rifles
|
3
|
2
|
1
|
MMG
|
2
|
2
|
1
|
75mm gun
|
3 dice
(any range)
|
||
47mm ‘Elephantino’
AT gun
|
6 dice (any range)
|
27th
Colonial Battalion – all deployed within 6” of walls (inside or out)
Big Man 1: Lt
Col Castagnola (Level 3)
Big Man 2: Lt
Minetti (Level 2)
Big Man 3: Sgt
Garibaldi (Level 2)
Big Man 4:
Bulucbashi Tesfaye, Eritrean NCO (Level 1)
Axis Platoons 1: 8
Eritreans with 2 x LMG (roll one extra
dice when shooting)
Axis Platoon 2: 8
Eritreans with 1 x LMG (roll normal fire dice)
Axis Platoon 3-4: 8
Eritreans with rifles only (roll one less fire dice when shooting)
Axis Platoon 5: 75mm
gun
Axis Platoon 6: MMG
with 5 crew
3 x Axis Anti-Tank
Guns: 2 x Anti-Tank Rifles, 1 x 47mm ‘Elephantino’ gun
(can be fired in any order)
Later in the
game:
The CO, if
alive/uncaptured, may attempt to call up
the Regia Aeronautica (add a Support Card to the deck for Italian bombers to
appear later)
 As you can see from the aerial photos, the Italians were occupying the fort, in front of that was an extended line of barbed wire and then in the cleared ground a thorn-bush zariba.
The games kicked off well for the British, the 'Stonk' forcing the Italians to keep their heads down while the Big Men ran around trying to rally the shock off. Under the cover of this shock and confusion the British surged forwards, especially on their right flank. Things got a bit sticky in the middle when two Matilda II threw tracks and another was 'troubled' by a direct hit from the 75mm gun.
 Soon the Indian infantry were lining the zariba although in his haste to rush troops to the front Lt-Col Tayler became the first British casualty of the game. He was felled by an Italian bullets and a stretcher party rushed him back to the aid station. The British attack now seemed to lose a bit of inertia and the Italians were pinning down the British, two of the MKVI lights also threw tracks, but their concentrated fire first drove away the machine-guns and Solothurns from the fort before them. Having cleared the zariba, the tanks pressed on and cleared the wire but without the Colonel to drive them on the Garhwalis on the right flank were difficult to motivate.
Despite another MkVI throwing a track intense pressure was put on the defenders of the right flank of the fort and soon the fire-step was cleared of all Italians, also the platoon of Askaris entrenched at the gap in the barbed wire was also driven off, the gate to the fort was open if the British could press this advantage.

Lt Shaw rushed from his position on the left to take command on the right and soon the attack was going in again. After clearing an Askari outpost, one section of Garhwalis was caught in the open and badly shot up, while another suffered terribly from direct fire from the 75mm gun, but the fire-step had been cleared of all the anti-tank guns and Solothurns allowing the tanks that were still mobile to press on.
We had a short break in order to celebrate Steve Jones birthday with a bit of cake - pictured below!
The poor terrain continued to play havoc with the tanks, by now all of the Mk VI lights were immobilised and two of the Matildas likewise. But, despite the late appearance of the Regia Aeronautica it was all over for the Italians. The mortars were now ranged in on the thinned out defenders and a Matilda II was at the gate. A bayonet charge led by Subedar Johal cleared the final outpost although he became another officer casualty in that attack. Colonel Castagnola rushed to rally the wavering Askaris but was shot down while urging them to hold their positions, seeing this Tenente Minetti dashed to the rear to fetch reinforcements - well that is his story!
A section of Garhwali Sappers stormed through the gate and started mopping up actions in the fort.
 The Garhwalis had carried the day - Phooey to Musso!
The game seemed to go pretty much as per the actual engagement, in the actual attack 2/3 of the British armour threw tracks on the poor terrain or were immobilised by Italian mines. The British took the fort but eventually abandoned it after concerted attacks by the Regia Aeronautica after they had regained air superiority.
Here are lots more photos, all the British and Indians are mine, painted by me, the Italians and the terrain is James and was all painted by him.
We also were very proud to have won the Best Game award, a trophy so shiny we could see our faces in it!

Don't forget to pop over and see our Battle of Keren game if you are at Salute this year.
Many more images! A feast of photos! James has a load more images and I'll post another article with those when I get them.
 |
| Italian outpost on the wire |
 |
| Indians advance through the elephant grass |
 |
| Vickers Mk VIB light tanks supported by infantry |
 |
| Indian infantry advancing |
 |
| Askaris man the barricades |
 |
| Vickers Wellesley bombs the Italian positions |
 |
| 3" mortar battery in the village |
 |
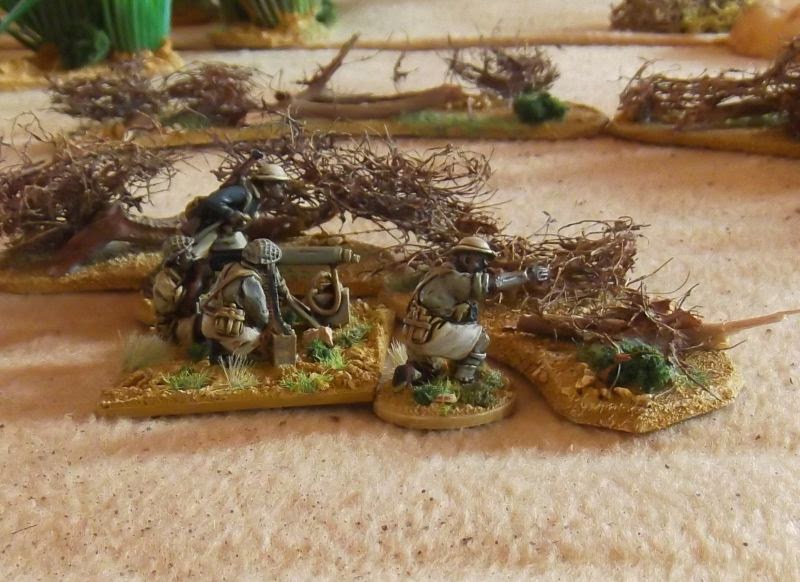
| 75mm howitzer |
 |
| Askaris line the fire-step |
 |
| Black-shirt MMG team |
 |
| 3" mortar battery |
 |
| Askaris defend the gap in the wire |
 |
| Mk VI advance through the elephant grass |
 |
| Aerial view after a few turns |
 |
| Matilda troop advance up the track |
 |
| Recreating the photo in the book |
 |
| Mk VI lights prepare to breach the zariba |
 |
| Garwalis take cover |
 |
| Through the zariba and on to the wire |
 |
| Concentrated 2" mortar fire |
 |
| Italians cleared from the fire-step |
 |
| Matilda prepares to breach the zariba |
 |
| Sgt Garibaldi rallies the defenders |
 |
| Bren team puts down suppressive fire |
 |
| 75mm howitzer |
 |
| Mk VIB lights on the wire |
 |
| Askaris hold the line |
 |
| Matilda commander |
 |
| Italian armoured car in reserve |
 |
| That 75mm howitzer again |
 |
| Shells fall in the fort |
 |
| The Garwalis press on |
 |
| The thin red-tarbusched-line |
 |
| Under fire the British press on |
 |
| Did I mention it was Steves birthday! |
 |
| The Askaris are routed from their positions |
 |
| Light tanks press on |
 |
| Italians on teh fire-step |
 |
| More Askaris on the fire step |
 |
| The end is nigh for Colonel Castagnola |
 |
| Closing in on the goal |
 |
| 3" mortar rounds fall among the defenders |
 |
| Another outpost is cleared |
 |
| At the cost of Subedar Johal |
 |
| Sappers break into the fort |
 |
| Vickers MMG provides fire support |