Copyright © 2011-2024, Paul Scrivens-Smith

Copyright © 2011-2024, Paul Scrivens-Smith

All rights reserved. This work may not be reproduced, in whole or in part, without the prior written permission of the creator.

Tuesday 28 August 2012

Black Powder Battle of Liebertwolkwitz

Yesterday at Maelstrom we re-fought a part of the Battle of Leipzig, namely the Battle of Liebertwolkwitz. Quinton had arranged the game and six of us played out the scenario on the day.

On the French side, Pete A took the part of Murat, James the part of Lauriston, Pete H the part of Drouot & Kellerman. I  played Victor on the right flank.

Quinton took on the Austrians and Al took the Russians. We were short on Prussians so their numbers were made up with more Austrians, it is a good job that Quinton has so many. Adie was also going to play on that side but had to drop out at the last moment.

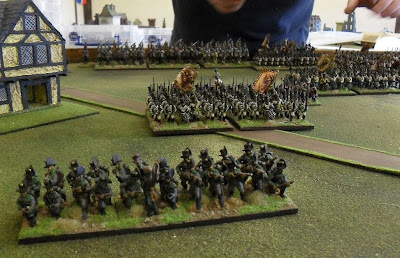
Setting up the troops

The French order of battle was something like:

Victor: 3 brigades each of 2 Line and 1 Leger, 2 batteries of artillery
Lauriston: 3 brigades each of 2 Line and 1 Leger, 2 batteries of artillery
Murat: 1 brigade of 3 Dragoons, 1 brigade of 1 Lancers and 2 Hussars
Kellerman: 1 brigade of 1 Cuirassier and 1 Carabinbier, 1 brigade of 2 Cuirassier
Drouot : 1 brigade of 2 Young Guard

Our commanders were all CV7 and our infantry all had a paltry moral save of 5+. We would be up against it.


I am not sure of the Austrian / Russian order of battle, but they had lots as can be seen from the images below.


All deployed and ready to make a start

Victors division, my own troops from my collection, I will try to hold the village of  Wachau

Russian deployment, Austrians to the rear

Quinton and Al prepare to have a go 'cos they think they are hard enough

Lauristons troops from the collection of James hold Liebertwolkwitz 

Adies Russians

The village of Liebertwolkwitz 
There were several pre-programmed events through the game and several random events that could affect the outcome. For the first three turns the French were unable to issue orders advance past their starting positions.

I'll start a battle report now, but as is usual with large games it will mainly be focused on my sector of the battle where Victors troops took on the Russians.

For the initial three turns we were not allowed to issue our troops into battle, so I had to make small adjustments to my deployment. However, I was very fortunate, because the Russians opposite me were very poor at giving orders, so bad in fact that one brigade did not make a move until the fifth turn. One Russian brigade did advance though and I was able to maul it quite badly.

Another view of my troops defending Wachau
On the other flank the Austrians were much more dynamic - well that is a turn up for the books - and were soon engaged with Lauristons division and pushing hard.

Austrian Jaegers supported by German infantry attack towards Lauristons division
 On my flank, not much was happening. Although at the start of turn three we had to roll a dice. A six, "is that good" We were given the news that Napoleon had arrived and our spirits were bolstered, our commanders were all raised to CV8 and our troops got a proper Moral save of 4+. In more good news we could now advance on the enemy!.


"Prepare to march" Victors Division readies to take the fight to the enemy.

Isolated Russian Brigade with lackadaisical support
Victor was soon issuing orders and one battalion was rushed into the farm on the left flank of the isolated Russian brigade. The rest of the brigade were soon engaging the brigade from the front.

Things were not going so well for Lauriston on our left flank and the Austrian attacks were soon starting to tell.
Austrians advance on Liebertwolkwitz 


Lauriston goes to to to with the Austrians

Hard pressed French

More hard pressed French on our left hand side.
More good news on turn 5,  Drouot organises a Grand Battery on Gallows Hill and the cavalry reserve is committed. One brigade of Carabiniers and Cuirassiers is sent to the left flank to shore up Lauristons weakened Division and the remainder prepares in the center.


One of Kellermans brigades heads to the left flank

Guard Cossacks in the center

Disaster on our left flank, the Austrians take the town of Liebertwolkwitz and Lauristons Division is broken. The light cavalry Division is committed in an attempt to break up the Austrian attacks. The Young Guard is ordered to retake Liebertwolkwitz

The Grand Battery starts pounding the Russians and Austrians in the center.

In my sector things are going much better, the previously static Russian infantry start to make a move, but are unable to clear my battalion from the pig farm in front of their lines in a timely manner. Although my battalion is eventually broken, by this time the Russians are at a severe disadvantage in numbers. The isolated Russian brigade is broken and must start retreating.

On turn seven another random event is rolled, this time by the Russians, and their is much glumness on their side - apparently on a good roll the French would have noticed the Russian Guards massing off table and we would have called off our advance.

Austrians eventually take Liebertwolkwitz

Grand Battery on Gallows Hill

Austrian Advance Guard advance - well it should be expected

On turn nine the Austrians and Russians get another envelope of orders, they must break off their attacks and return to their start lines. Although along the majority of the line the French are unable to capitalise on this as apart from Victors troops there are a lot of broken brigades. However, Victor presses on and the Russians are soon pegged back on the hill line where they started the game.

On turn 12 it is all declared over and pretty much a draw. The French objective of breaking the Austrians and Russians is not me and the Austrians no longer hold Liebertwolkwitz and the Russians got nowhere near Wachau.

Here are loads more images from the game.


Victors troops advance
Russian infantry brigade
About the half-way mark


French Lancers and Hussars engage the Austrians in an attempt to break up the attack.

Austrians before Liebertwolkwitz

More Austrians, Quinton reckons I never get enough pictures of these

About half way through the game
French advance


The French left collapses

French cavalry mass in the center


Russian view of the center


Now that is a cavalry charge

Long view


Sunday 26 August 2012

Pacific War Reinforcements

Back in my teens I used to own a massive collection of WWII ships and would play many a game of General Quarters with my mates. I let these ships go the way of eBay many years ago, and if I'm honest they looked like they were painted thirty years ago and were not getting any usage.

A couple of years ago we re-discovered General Quarters and I started building up a new collection of 1/3000 WWII naval ships again. Although this time I would find an historical battle and then purchase all the ships needed to play it rather than buying massive, disparate fleets on a whim. I've mainly concentrated on cruiser size battles and below as you can have a really good game on an 8ft square playing area.

A few days ago, I placed a small order on Navwar and with typical Navwar efficiency they were with me in just a few days. It was just a matter then of painting them. This is the method I use:

  1. Clean up the ships
  2. Stick to plywood bases, typically 75mm x 25mm for cruisers and 50mm x 20mm for destroyers
  3. Create a 'sea' effect with Vallejo Gel Denso
  4. Spray with Halfords grey primer
  5. Paint the ships with Vallejo paints, I find this guide really useful for painting the USN vessels. This is also a really good comparison chart for the Vallejo colours.
  6. Paint the bases with Vallejo Prussian Blue
  7. Drybrush the entire ship and base with Vallejo Pale Grey
  8. Wash the decks and super-structure with a glaze of Vallejo Black
  9. Wash the 'sea' with a glaze of Vallejo Dark Prussian Blue
  10. Hilight the sea, wake, etc. with Vallejo White
  11. Varnish with matt varnish

In just a few hours this weekend I have painted 5 IJN cruisers, 18 IJN destroyers, 2 USN cruisers, 18 USN destroyers, 2 Royal Netherlands Navy destroyers.

Here are some shots of the ships painted over the weekend:

Having painted these last few ships, I now have every ship in my collection to do the following historical engagements:


  • Battle of the River Plate
  • Battle of the Java Sea
  • Battle of Sunda Strait
  • First Battle of Savo Island
  • Third Battle of Savo Island
  • Fourth Battle of Savo Island
  • Battle of Empress Augusta Bay

Plus I have a few extra ships so that I can do many 'what-if' engagements too. It's become rather an obsession and I now have the following painted ships in my collection:

  • Imperial Japanese Navy : 2 battle-cruisers, 16 heavy cruisers, 10 light cruisers, 1 aircraft carrier, 44 destroyers, 1 sea plan tender & 3 submarines.
  • Kreigsmarine: 1 battle-cruiser.
  • Royal Netherlands Navy: 4 light cruisers & 6 destroyers.
  • Royal Australian Navy: 2 heavy cruisers, 3 light cruisers & 3 destroyers.
  • Royal Navy: 4 heavy cruisers, 1 light cruiser & 8 destroyers
  • Royal New Zealand Navy: 1 light cruiser
  • United States Navy: 2 battleships, 9 heavy cruisers, 13 light cruisers, 38 destroyers & 4 submarines.
  • Merchants: 12 various ships

Here are some images of the ships painted this weekend:


IJN heavy cruisers: Takao, Atago, Maya, Aoba & Kinugasa

18 IJN destroyers of various classes


Koninklijke Marine destroyers Van Nes and Van Ghent
USN light cruisers Atlanta & San Diego

18 USN destroyers of various class

IJN heavy cruiser Aoba

IJN heavy cruiser Takao

USS San Diego


IJN destroyer Ayanami

IJN destroyer Harusame


RNN destroyer Van Ghent


USN destroyer Parrott


Saturday 25 August 2012

The Battle of Morgans Crossroads

I set up another game of Black Powder American Civil War with Matt at the White Hart. James was also without a game so it gave me the opportunity to try out a fictitious scenario I had been mulling over.
James and Matt ready to go head to head.
The CV of the commanders and the attributes assigned to the troops are all randomly determined as are the arrival of the reinforcements.

A Confederate brigade holds the strategically important town of Morgans Crossroads. They are deployed expecting an attack from the west. and Union troops are visible along that road.

Confederate 1st Brigade - Commander CV7
Type
Armament
HtH
Shooting
Morale
Stamina
Special
Infantry
Rifled Muskets
6
3
4+
3
Elite 5+
Tough Fighters
Infantry
Rifled Muskets
6
3
4+
3
Elite 5+
Tough Fighters

Infantry
Rifled Muskets
6
3
4+
3
Elite 5+
Tough Fighters

Infantry
Rifled Muskets
6
3
4+
3
Elite 5+
Tough Fighters

Artillery
Smoothbore  Artillery
1
3-2-1
4+
2


A column of troops is rushing to support the brigade in the town up the road from the east.

Confederate 2nd Brigade - Commander CV7
Type
Armament
HtH
Shooting
Morale
Stamina
Special
Infantry
Rifled Muskets
6
3
4+
3
Tough Fighters
Infantry
Rifled Muskets
6
3
4+
3
Tough Fighters
Infantry
Rifled Muskets
6
3
4+
3
Tough Fighters
Infantry
Rifled Muskets
6
3
4+
3
Tough Fighters
Artillery
Rifled Artillery
1
2-2-2
4+
2


However a swift Union right-hook means that the town may become out-flanked. A brigade of Union troops have appeared from the south.

Union brigade approaching from the south.
Union 1st Brigade - Commander CV8
Infantry
Rifled Muskets
6
3
4+
3
Elite 5+
Infantry
Rifled Muskets
6
3
4+
3
Elite 5+
Infantry
Rifled Muskets
6
3
4+
3
Elite 5+
Infantry
Rifled Muskets
6
3
4+
3
Elite 5+
Infantry
Rifled Muskets
6
3
4+
3
Marauders, Skirmish,
Reliable, Sharpshooters
Artillery
Rifled Artillery
2
3-2-2
4+
3


The sneaky Union flanking manoeuvre from the south.
The Divisional Commander (CV8) is also supporting this right hook. A 2nd Union brigade is approaching from the West as expected.

Union 2nd Brigade Commander - CV7
Type
Armament
HtH
Shooting
Morale
Stamina
Special
Infantry
Rifled Muskets
6
3
4+
3

Infantry
Rifled Muskets
6
3
4+
3

Infantry
Rifled Muskets
6
3
4+
3

Infantry
Rifled Muskets
6
3
4+
3

Artillery
Smoothbore Artillery
2
4-2-1
4+
3


Both sides can expect another brigade of troops each to turn up some time.

The Confederates take the first turn and immediately the 2nd Brigade rushes up the road to support the troops in Morgans Crossroads. The 1st brigade commander issues the first of many failed order attempts, but the Confederate CinC is able at least to redeploy the artillery to face the threat from the south.


The Confederate 2nd Brigade advance on the town.
The Union troops approaching from the west stall, but the flanking force on their right moves to get into position. The artillery battery is deployed on a hill overlooking Morgans Crossroads and in conjunction with the sharp-shooters is soon exchanging fire with the rebels.
Dispositions at the end of the first turn
As the game progresses, the Union troops eventually arrive and deploy to the west of the town. The Confederates try to counter this by moving a unit out of the town and up to the stone walls, but given some poor order dice the unit is left in the open and cut down by concentrated fire. The Union right flank attack also succeeds in destroying the Confederate regiment holding the right flank of the town and that artillery battery. The Confederates now have a broken Brigade, but the two remaining units occupy the town so do not need to fall back. Their commander has issued a single successful order in about seven turns.

Once the Union troops to the west have deployed  the third Union brigade following them up the road is also able to start deploying onto the table on the right of the 2nd Brigade.

Union 3rd Brigade - Commander CV8
Infantry
Rifled Muskets
6
3
4+
3
Elite 6+
Infantry
Rifled Muskets
6
3
4+
3
Elite 6+
Infantry
Rifled Muskets
6
3
4+
3
Elite 6+
Infantry
Rifled Muskets
6
3
4+
3
Elite 6+
Infantry
Rifled Muskets 6 3 4+ 3 Elite 6+
Artillery
Rifled Artillery
2
3-2-2
4+
3


The head of the column of the Union 3rd Brigade as it moves onto the field of battle
However, the Union does not have it all their own way, rapidly marching to the sound of the regimental bands playing Dixie a Confederate relief column snakes down the road from the woodland in the north.

Confederate 3rd Brigade - Commander CV7
Type
Armament
HtH
Shooting
Morale
Stamina
Special
Infantry
Rifled Muskets
6
3
4+
3
Elite 5+
Tough Fighters
Infantry
Rifled Muskets
6
3
4+
3
Elite 5+
Tough Fighters
Infantry
Rifled Muskets
6
3
4+
3
Elite 5+
Tough Fighters
Infantry
Rifled Muskets
6
3
4+
3
Elite 5+
Tough Fighters
Artillery
Smoothbore  Artillery
1
3-2-1
4+
2


Despite some mix up with the order of match, these troops are soon deploying on the wood edge on the left flank of the Union second brigade and are also able to support the regiments from the broken brigade in the town. It looks very dicey for the Union second brigade as their first unit is shattered by flanking fire from the woods and poor command rolls mean that they are finding it very difficult to react to the flank attack.

Confederate reinforcements fall upon the Union left flank
However in the Union center and left the attack on the crossroads is pushed home and the second Confederate brigade is also broken by musket and cannon fire. Having lost two brigades out of three the Confederate force is shattered and must retreat from the field.

We had played at least ten turns and not had a single round of hand to hand combat.

All in all a very good game, at the start of the game I made the commanders roll for their CV, for the Confederates, on a 1-2 they would be CV7 and on a 3+ would be CV8, they ended up with three CV7! For the Union it would be a CV7 on a 1-4 and a CV8 on a 5+, they ended up with two CV8 and a CV7. I think this had a telling effect on the outcome. Also as the Union were more able to dictate the pace of the game, they were able to win the fire-fights and no hand to hand, where the Confederates had superiority took place.

Here are some more shots of the game. all the terrain and figures are from my collection. The miniatures are from Adler and are painted by myself. As we are using 6mm figures we play at half ranges and it seems to give a very good game on a 6ft x 4ft board.

We play a few modifications on the standard Black Powder rules to give what I think is a ACW feel.

  1. A Brigade is broken when more than half of its units are shattered or lost.
  2. Passage of lines takes a half move.
  3. To represent the larger Union artillery batteries they get +1 dice at close range, +1 in HtH and +1 Stamina
  4. To represent the difference between rifled and smooth-bore artillery, the rifled batteries are on 2 dice at all ranges.
  5. Infantry may form in either:
    • Supported line – two bases deep counting as line
    • Mixed order Supported line – two bases deep counting as mixed order line
    • Extended line – one base deep counting as skirmishers
    • March column


The Union attack develops, but Confederates appear on the left flank


Position at the end of the game


Confederates advance through the woods to fall on the Union left.


The Union attack develops

Another shot from the center of the Union lines

 There were also a few other games going on at the club on Thursday, and this one in particular caught my eye. A game of DBR in 28m using the lovely 1672 range of figures from Northstar